Table of Content
- Designing a Unidirectional Workflow for Microbiology Lab Setup
- Dividing the Laboratory into Functional Zones
- Working of the Biosafety Cabinet in microbiology lab
- Planning Work Surfaces, Ergonomics, and Essential Utilities
- Safety and Decontamination Facilities
- Conclusion: Build the Microbiology Lab Around the Work
A well-planned microbiology lab setup is about much more than placing workbenches and laboratory equipment inside a room. Microbiology laboratories handle cultures, biological samples, microorganisms, reagents, and sensitive instruments, making proper planning essential for maintaining safety, controlling contamination, and improving workflow.
Designing a Unidirectional Workflow for Microbiology Lab Setup
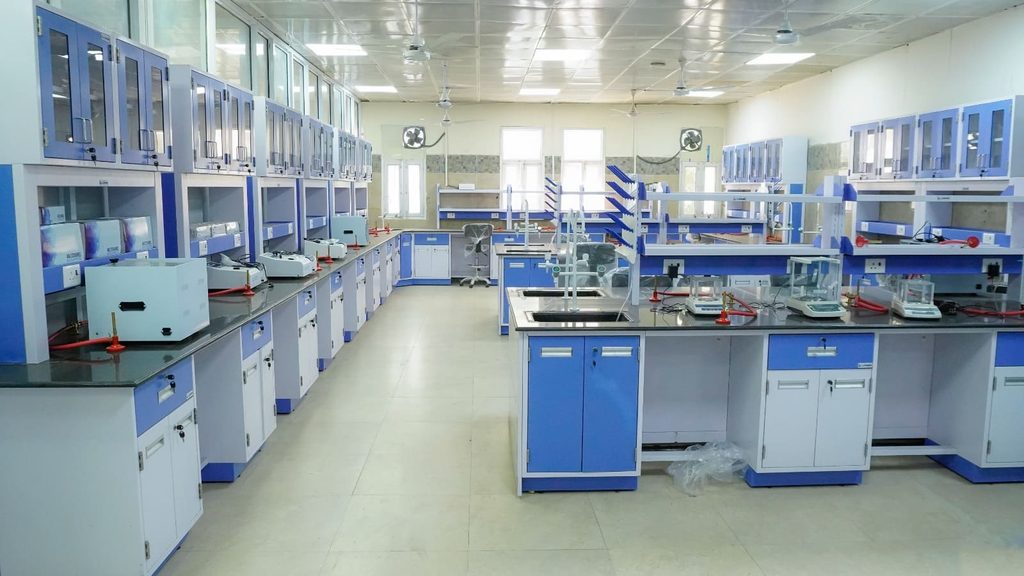
One of the most important aspects of a microbiology lab setup is creating a logical, preferably unidirectional workflow. Samples should move through the laboratory in a planned sequence rather than repeatedly crossing between clean and contaminated areas.
A typical unidirectional workflow follows:
Sample Receiving → Sample Preparation → Culture and Inoculation → Incubation → Observation and Analysis → Decontamination → Waste Disposal
The goal is to reduce backward movement and unnecessary crossing of samples, personnel, and waste. For example, freshly prepared media should ideally not travel through areas where biological waste or processed cultures are handled.
Similarly, waste generated after culture work should move toward decontamination and disposal areas without passing back through clean workspaces. Moreover, planning this movement at the layout stage helps reduce cross-contamination risks and makes daily operations more organized.
Dividing the Laboratory into Functional Zones
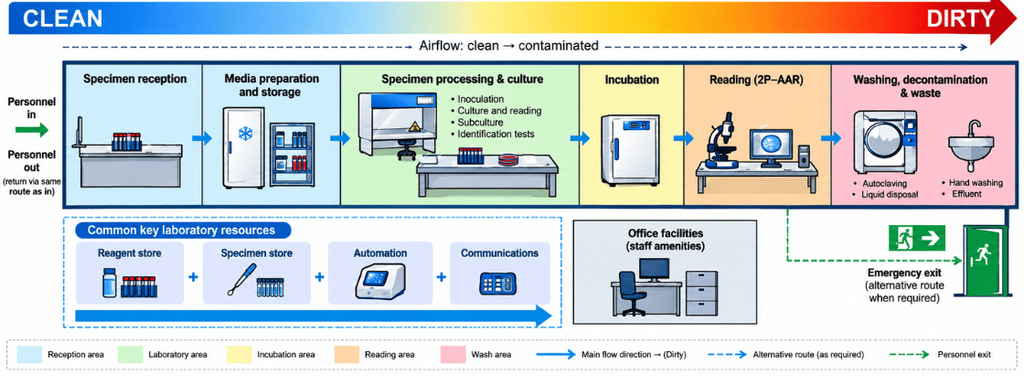
A microbiology laboratory performs several different activities, and each of them may require different environmental, utility, and safety conditions. The exact room depend on the size and level of the microbiology lab, but the functional zones reoccur. The zones are divided into:
Media and Reagent Preparation
The media and reagent preparation area supports the preparation of culture media, buffers, stains, and other solutions used in microbiological work. To begin with, laboratory planners should keep this area clean, organized, and separate from contamination-prone activities. In addition, they should provide suitable workbenches, dedicated storage for chemicals and glassware, and convenient access to water. Keeping this activity separate from culture-handling areas helps reduce the risk of contamination.
Sample Preparation
Before Testing, the sample preparation area is where incoming samples are received, labelled, measured, diluted, or processed. The workspace should provide enough bench space for routine preparation activities and should be located close to the next stage of the workflow.
Culture and Inoculation
The culture and inoculation area supports the transfer of microorganisms, inoculation of culture media, and controlled handling of microbial cultures. Depending on the procedures, laboratories may equip this area with a biosafety cabinet or laminar airflow cabinet. Lab planners should position this zone away from heavy foot traffic, doors, and strong air currents to maintain stable working conditions and reduce the risk of contamination.
Incubation
The incubation area houses equipment such as incubators, BOD incubators, and shaking incubators. These instruments maintain cultures under controlled temperature and environmental conditions, allowing laboratory staff to support consistent microbial growth and observation. This zone should provide adequate electrical supply, ventilation, and sufficient clearance around equipment. It is also important to organize incubators so cultures can be monitored and accessed without disrupting other laboratory activities.
Microscopy and Analysis
The microscopy and analysis area is used for observing cultures, identifying microorganisms, recording results, and carrying out analytical measurements. It may include microscopes, colony counters, analytical balances, spectrophotometers, and other instruments.
Laboratory Storage of Microbiology lab setup
The laboratory storage area keeps reagents, consumables, glassware, PPE, documentation, and other laboratory materials organized and protected. Separate storage should be planned for chemicals, clean glassware, biological samples, and temperature-sensitive materials. Full-height cabinets, overhead cabinets, under-bench storage, refrigerators, and freezers can be used depending on the specific requirements of the microbiology lab setup.
Washing, Decontamination, and Waste
The washing, decontamination, and waste area is used for cleaning glassware, sterilizing contaminated materials, and managing laboratory waste before disposal. This section may include sinks, drying racks, autoclaves, waste containers, and sharps disposal units.
Working of the Biosafety Cabinet in Microbiology lab
A biosafety cabinet (BSC) is an important part of a modern microbiology lab setup, especially where microorganisms, cultures, or biological samples are handled. It creates a controlled workspace by using directed airflow and HEPA filtration to help protect the user, the sample, and the surrounding laboratory environment.
In a commonly used Class II biosafety cabinet, the cabinet draws room air inward through the front opening to help prevent contaminated aerosols from reaching the operator. Inside the cabinet, HEPA filters clean the air, and the system directs the filtered air vertically over the work surface. It then captures potentially contaminated air and passes it through HEPA filters before recirculating or exhausting it.
Because its performance depends on stable airflow, the biosafety cabinet should be positioned away from doors, open windows, busy walkways, and strong air-conditioning vents. During microbiology lab planning, its location should also allow adequate clearance, convenient utility access, and easy cleaning and maintenance.
Planning Work Surfaces, Ergonomics, and Essential Utilities
Beyond the zones and airflow, worktops, services and fittings matter for a working and clean environment.
Work Surfaces and Workbench Space for Microbiology Lab Setup
In a modern microbiology lab setup, work surfaces should be non-porous, durable, easy to clean, and resistant to moisture, disinfectants, and commonly used chemicals. Since microbiology laboratories require frequent cleaning and decontamination, poorly maintained or porous surfaces can increase contamination risk.
Adequate bench space is also important. Workstations should provide enough room for equipment, samples, glassware, and consumables without overcrowding. Proper spacing between benches helps improve movement, reduces clutter, and supports safer laboratory work.
Selecting Durable Efficient Lab Workbench Layouts of Microbiology Lab Setup
Equally important, laboratory planners should consider ergonomics while arranging benches, seating, storage, and equipment. The workbench height should match the activity, whether laboratory personnel perform the task while sitting or standing.
Moreover, staff should be able to reach frequently used items such as media, pipettes, microscopes, and small instruments without excessive stretching or bending. Placing related activities close to one another also reduces unnecessary movement of both personnel and samples.
Optimizing Laboratory Lighting and ventilation
Furthermore, proper lighting directly supports accurate laboratory work. Designers should provide sufficient and even illumination in areas used for microscopy, colony observation, sample examination, and analytical procedures. Good lighting allows laboratory personnel to observe samples more clearly and perform detailed tasks comfortably.
At the same time, the ventilation system should maintain a safe and comfortable working environment. It should support the laboratory’s overall airflow strategy without creating strong air currents around equipment such as biosafety cabinets.
Planning Power Supply and Essential Lab Services
Before installing laboratory furniture, planners should determine the location of all essential utilities in the microbiology lab setup. These may include:
- Electrical sockets and laboratory electrical modules
- Water supply
- Laboratory sinks
- Drainage
- Gas connections
- Data points
- Ventilation connections
- Backup power
Safety and Decontamination Facilities
A safe microbiology lab setup should provide clear access to emergency exits and place handwashing stations near exit points. Safety equipment should also be located close to the areas where incidents are most likely to occur.
Essential facilities may include:
- Eyewash stations and safety showers where required
- First-aid kits and accessible fire-safety equipment
- Spill kits near sample and chemical handling areas
- Emergency alarms and contact information for quick response
Most importantly, staff should be able to reach these facilities immediately. During a spill, splash, or sharps injury, quick access to safety equipment can significantly improve emergency response.
Conclusion: Build the Microbiology Lab Around the Work
A successful microbiology lab setup starts with understanding the laboratory workflow and planning each area around the activities performed there. Functional zoning, biosafety equipment, laboratory furniture, work surfaces, utilities, storage, and safety facilities should work together to support contamination control, efficient movement, and safe day-to-day operations.
With proper planning, institutions can create a microbiology laboratory that is practical, organized, and ready for future needs. Planning a microbiology lab? Contact Labkafe for customized laboratory layouts, modular furniture, equipment planning, utility integration, and complete installation support.







Leave a Reply