Pendulum Experiment Physics Practical
Aim:
To study variation of time period of a simple pendulum experiment physics practical of a given length by taking bobs of same size but different masses and interpret the result.
Apparatus:
- A Clamp With Stand
- Bob with Hook of Different Masses
- Split Cork
- Stop Clock/Stop Watch
- Vernier Callipers
- Cotton Thread
- Half Meter Scale
Theory:
See Experiment 6.
The time period (T) of a simple pendulum for oscillations of small amplitude, is given by the relation,
T = 2π√(L/g) or T2 = (4π2/g) × L
∴ T ∞√L and T ∞ 1/(√g)
From the above equation, it clearly indicates that the time period of a simple pendulum is independent of mass i.e. for the same value of L and g, the time period of two bobs of different masses will be the same.
Procedure:
- Choose any three bobs of known masses and determine their radius as in Experiment 1.
- Now, arrange the experiment set up for first bob (say mass m1) with any effective length of simple pendulum (say 90 cm) as explained in Experiment 6. The effective length of the simple pendulum will be kept same in each case.
- Record average time taken for 20 or 25 oscillations by the simple pendulum by performing step 4 to 15 as explained in Experiment 6.
- Calculate the time periods for each bob and record them in table 7.1.
Observations:
Vernier constant
Vernier constant of the vernier callipers, V.C. = ______________ cm
Zero error, ±e = _____________cm
Least count of stop clock = ____________s
Zero error of stop clock = ___________s
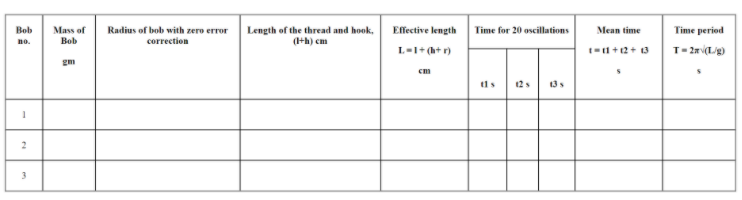
Table 7.1 Determination of time-periods for same lengths of the different pendulum.
Graph:
Result:
For the same value of effective length and acceleration due to gravity, the time period of bobs for different masses are same.
Precautions :
- The thread should be very light and strong.
- The point of suspension should be reasonably rigid.
- The pendulum should oscillate in the vertical plane without any spin motion.
- The floor of the laboratory should not have vibration, which may cause a deviation from the regular oscillation of the pendulum.
- The amplitude of vibration should be small (less than 15) .
- The length of the pendulum should be as large as possible in the given situation.’
- Determination of time for 20 or more oscillations should be carefully taken and repeated for at least three times.
- There must not be strong wind blowing during the experiment.
Reference:
- http://www.ncert.nic.in/
- https://www.learncbse.in/
About Labkafe: Lab Equipment Manufacturer & Exporter
We are a School laboratory furniture and Lab equipment manufacturer and supplier. In laboratory furniture for school, we first design the entire laboratory room keeping in mind the requirements as per affiliation CBSE Bye-Laws. Also, we take care of the complete designing and installation of laboratory furniture.
In the lab equipment section, we have a wide range of glassware, chemicals, equipment and other lab accessories. Most of them are available for order online on our website but some of them can be procured on demand.
If you have need:-
- laboratory equipment or lab furniture requirements for school
- composite lab equipment list for school
- Physics lab equipment list for school
- Chemistry lab equipment list for
- Biology lab equipment list for school
- Pharmacy lab equipment
Do drop a message through chat or mail us at [email protected] or call +919147163562 and we’ll get in touch with you.


Leave a Reply