Aim of the Simple Pendulum Experiment in Class 11
Using a simple pendulum, plot the L vs T2 graph and use it to find the effective length of a second’s pendulum.
Apparatus for the Simple Pendulum Experiment: Class 11
- A Clamp with Stand
- Bob with Hook
- Split Cork
- Stop Clock/Stop Watch
- Vernier Calipers
- Cotton Thread
- Half Meter Scale
Theory for the Simple Pendulum Experiment: Class 11
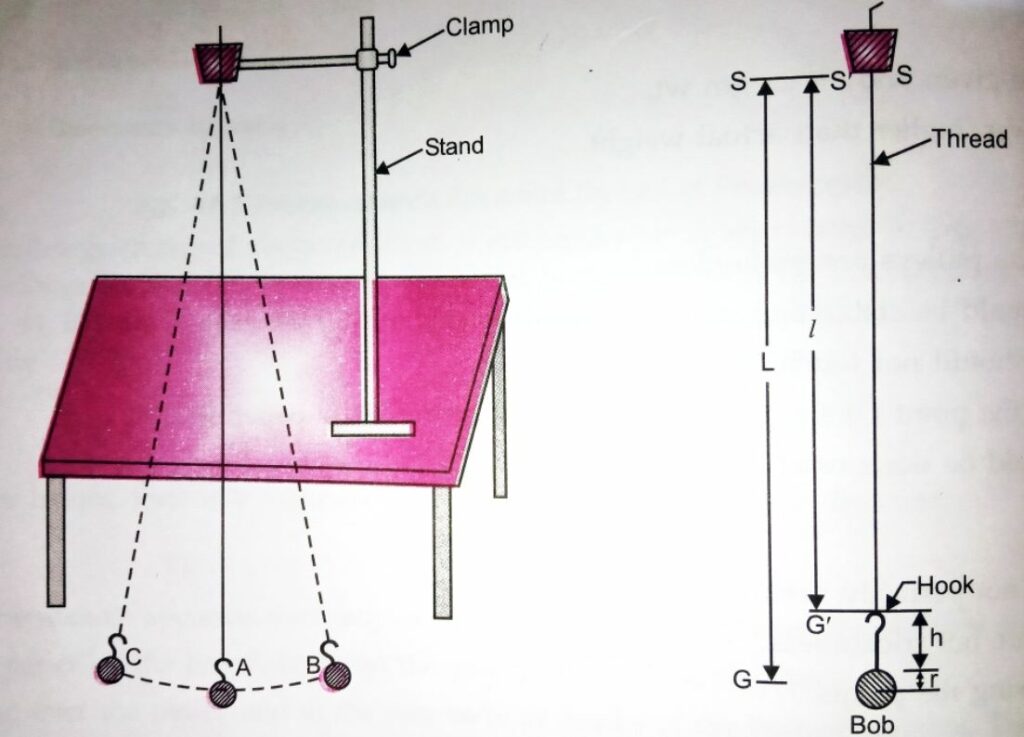
A simple pendulum consists of a heavy metallic bob (usually brass) suspended from a rigid stand. The bob has a hook and hangs from a weightless, inextensible, and perfectly flexible thread. The thread passes through a slit cork held by a clamp on the stand. The pendulum oscillates in a single vertical plane with a small amplitude (less than 15°), ideally without any friction.
Although no perfect simple pendulum exists in practice, we create one by tying a metallic spherical bob to a fine cotton stitching thread.
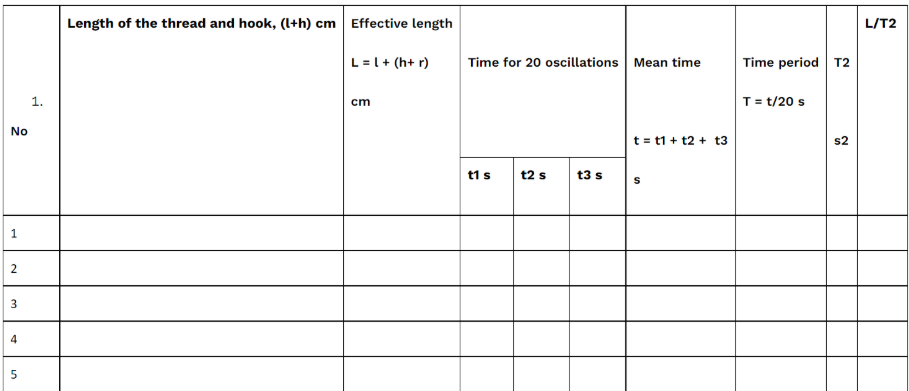
The spherical bob can be considered a point mass concentrated at its centre of gravity (G). The distance from the point of suspension (S) to the centre (G) is known as the effective length of the pendulum.
The effective length (L) of the simple pendulum is given by:
L = l + h + r
Where:
- l is the length of the thread
- h is the length of the hook
- r is the radius of the spherical bob
This effective length determines the time period of oscillation of the pendulum.
This theory forms the basis for studying time period, acceleration due to gravity, and periodic motion in school physics labs. It is commonly used in Class 9, Class 10, and Class 11.
The simple pendulum produces Simple Harmonic Motion (SHM) as the acceleration of the pendulum bob is directly proportional to its displacement from the mean position and is always directed towards it. The time period (T) of a simple pendulum for oscillations of small amplitude is given by the relation:
T = 2 π √(L/g)
Where, g is the value of acceleration due to gravity and L is the effective length of the pendulum.
T² = (4π²/g) × L or T² = KL (K = constant)
and, g = 4π²(L/T²)
If T is plotted along the Y-axis and L along the X-axis, we should get a parabola. If T² is plotted along the Y-axis and L along the X-axis, we should get a straight line passing through the origin.
Procedure for Simple Pendulum Experiment: Class 11
- First, find the vernier constant and note any zero error of the vernier callipers.
- Next, measure the bob’s diameter in three directions with the callipers, correct each reading, average them, and halve the mean to obtain the radius r.
- Measure the hook length (h) with the calipers and record it in the table below.
- Choose an integer effective length L (for example, 80 cm). Compute the thread length l so that L = l + h + r. Measure l on the thread and mark that spot with ink as M₁.
- In the same way, place ink marks M₂, M₃, M₄, M₅ and M₆ so that the effective lengths become 90 cm, 100 cm, 110 cm, 120 cm and 130 cm respectively.
- Pass the thread through the two halves of a split cork until mark M₁ just appears below the cork, then tighten the cork in the clamp so its joint is perpendicular to the swing plane.
- Fix the clamp on a stand positioned so the bob hangs at least 2 cm above the base.
- Chalk point A directly under the resting bob, then draw a 10 cm line BC with A at its center; the bob will oscillate across this line.
- Find the least count and zero error of the stopwatch and reset it to zero.
- Displace the bob gently to point B (keeping the angle below 15 °) and release it without spin, checking that it crosses line BC symmetrically.
- Start the stopwatch the instant the bob passes point A heading right. Count 20 complete oscillations (mean‑position to mean‑position in the same direction) and stop the watch; enter the time t for 20 oscillations in the table.
- Find the time at least three times for the same length to reduce random error.
- Shift the suspension to mark M₂ (≈ 90 cm effective length) and repeat Steps 1 to 12.
- Collect similar data for M₃, M₄, M₅ and M₆ so that you have results for at least six different lengths.
- After finishing the last timing, let the bob stop, loosen the clamp, remove the split cork, untie the thread, and store the bob, thread, calipers and stopwatch safely.
Record Observations
Vernier constant
Vernier constant of the vernier calipers, V.C. = ______________ cm
Zero error, ±e = _____________cm
Diameter of the bob and length of hook
Observe diameter of the bob:= (i) ______cm, (ii)________cm, (iii)___________cm
Mean diameter of bob, d0 = _________cm
Mean corrected diameter of bob, d = d0 ±e = __________cm
Radius of the bob, r = d/2= ____________ cm
Length of the hook, h= __________cm
Standard value acceleration due to gravity, g1: 980 cm.s-2
Least count of stop clock = ____________s
Zero error of stop clock = ___________s
Table: Determination of time-periods for different lengths of the pendulum
Mean= L/T2 = _______________________
Calculation:
We know, T = 2 π √ (L/g)
Experimental value, g= 4π2(L/T2) = ______________________
So, %error = (g-g1)/g *100 = ______________________
Graph:
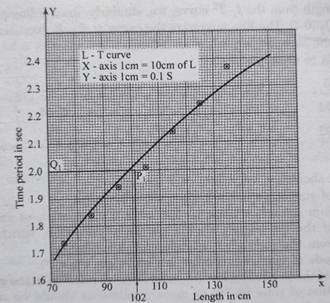
L vs T graph
Plot the graph between L and T from the observations recorded in the table. Take L along X-axis and T along Y-axis. The L-T curve is a parabola.
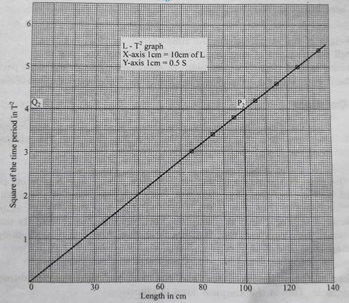
L vs T2 Graph
Plot the graph between L and T2 from the observations recorded in the table. Take L along X-axis and T2 along Y-axis. The L-T curve is a straight line passing through the (0, 0) point. So, the origin of the graph should be chosen (0, 0). As shown in the figure 6.3.
Determination of length of a seconds pendulum from graph:
A second pendulum has time-period 2 s. To find the corresponding length of the pendulum from the L-T graph, draw a line parallel to the L-axis from the point Q1 (0, 2). The line interval the curve L-T at P1. So, the coordinates of P1 is (102, 2).
Length of the seconds pendulum is _____________(102) cm.
To find the length from the L-T2 curve, we, similarly, draw a line parallel to L-axis is form a point Q2 (0, 4). The line intersects the curve at P2. P2 has coordinates (100, 4).
Length of the seconds pendulum is _______________(100) cm.
Precautions :
- The thread should be very light and strong.
- The point of suspension should be reasonably rigid.
- The pendulum should oscillate in the vertical plane without any spin motion.
- The floor of the laboratory should not have vibration, which may cause a deviation from the regular oscillation of the pendulum.
- The amplitude of vibration should be small (less than 15) .
- The length of the pendulum should be as large as possible in the given situation.’
- Determination of time for 20 or more oscillations should be carefully taken and repeated for at least three times.
- There must not be strong wind blowing during the experiment.
Reference:
- http://www.ncert.nic.in/
- https://www.learncbse.in/
you may download Simple Pendulum Experiment Class 11 practical manual .pdf Download Now
About Labkafe: Lab Equipment Manufacturer & Exporter
We are a school laboratory furniture and Lab equipment manufacturer and supplier. In laboratory furniture for school, we first design the entire laboratory room keeping in mind the requirements as per affiliation CBSE regulations. Also, we take care of the complete designing and installation of laboratory furniture.
In the lab equipment section, we have a wide range of glassware, chemicals, equipment and other lab accessories. Most of them are available for order online on our website but some of them can be procured on demand.
If you have need:-
- laboratory equipment or lab furniture requirements for school
- composite lab equipment list for school
- Physics lab equipment list for school
- Chemistry lab equipment list for
- Biology lab equipment list for school
- Pharmacy lab equipment
do drop a message through chat or mail us at [email protected] or call contact us +919147163562 and we’ll get in touch with you.


Leave a Reply