Among the major laboratory experiments in the class XI-XII biology practical are the Macro Nutrient Tests. Also commonly known as food tests for class 11 or 12, this is actually a group of five tests ‒ one each for starch, glucose, sucrose, protein, and fat. Today, we will describe each of those tests for your convenience.
The macro nutrient tests or food tests for classes 11-12 are highly important in all education boards including CBSE, ICSE, ISC, IGCSE, IB, and state boards like WBCHSE biology practical syllabus . These tests are included in all of their curriculums, with slight or no variation.
There are more than one way to do some tests in this group. Some schools do all of the tests, and some just prefer one. We will show you the most common food tests done in school. These are:
- For starch: iodine test
- For glucose: benedict test and fehling test
- For sucrose: sucrose test (which is a variation of benedict)
- For protein: biuret test (very important!)
- For fat: paper droplet test
Note that in the syllabus you may note more tests like xanthoproteic test, Millon’s reagent test, and Sudan III test. These are very uncommon for various reasons ‒ materials are hard to come by, the test is very difficult to conduct, or as in the last case ‒ reagent is prohibitively expensive. The tests above are the most common experiments you will find in school biology labs.
Now let’s get into each test.
Iodine Test for Starch
Starch is among the most important carbohydrates, so this test is also called the carbohydrate test (though not all carbs are starches) due to oversimplification. Starches are made of polysaccharide and glucoside, and they are generally found as food reserves in plants ‒ in roots or seeds. The most common examples of plant starch reserves are potato, rice and wheat ‒ our main bulk of food. You will also find plenty of prepared foodstuff rich with starch, like bread or biscuits. We will use biscuits today.
Ingredients required:
- Test tubes
- Dropper
- Small beaker (50 ml)
- Iodine solution (comes prepared)
- Food sample (a biscuit in this case)
How to perform iodine starch test
- Take a little part of the biscuit (just a pinch) and crush it thoroughly.
- Put it in a test tube and add some distilled water (plain RO water will work as well). About 3-4 ml should suffice. Shake well to make a suspended solution. Our liquid looks cloudy white.
- Take a little bit of iodine solution in a clean dropper, and pour 2-3 drops of it into the test tube.
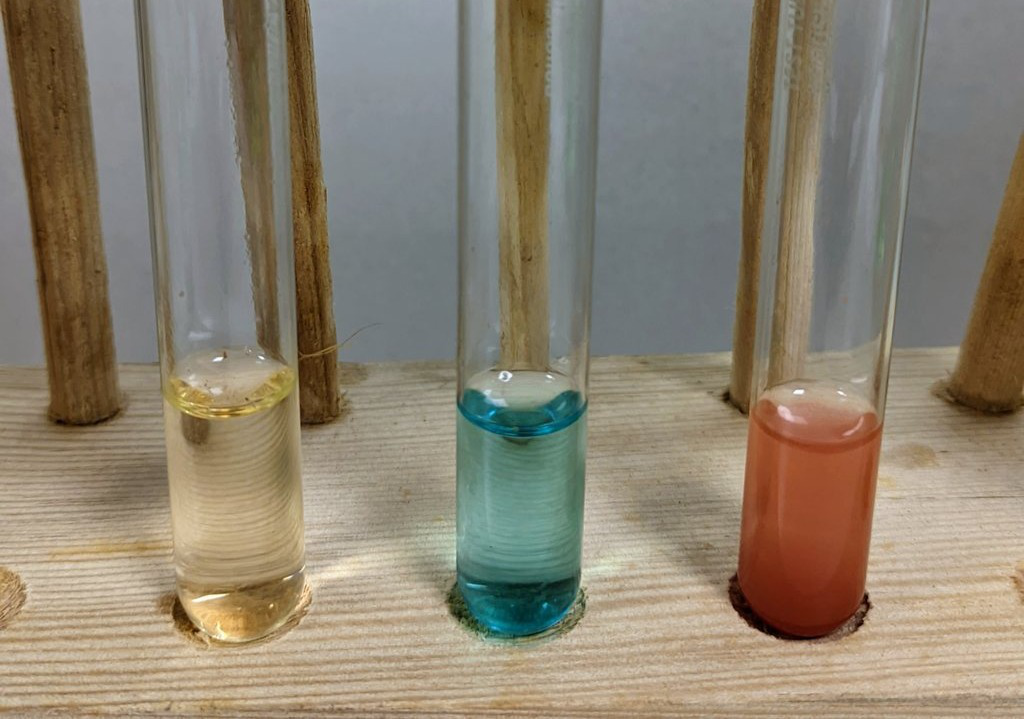
- The liquid inside the test tube should start changing color immediately. Depending upon the concentration of the sample, you should be able to see a bluish-black or almost black color. This indicates the presence of starch.
Explanation of the iodine test
Iodine solution is generally yellow or amber colored. When it comes into contact with starch-like compounds, the smaller iodine atoms slip into the larger starch molecules. They have a complicated relationship. Anyway, these starch-iodine complex molecules look blackish blue ‒ that is the color you see in the tube.
Benedict Reagent Test for Glucose
Glucose is called a ‘powerhouse chemical’ for the body, because it is THE compound which breaks down to provide energy for the body. It is naturally present in sweet fruits and vegetables like bananas. Most foodstuffs do not naturally have glucose, but those few that do, can be detected quite easily with the Benedict’s Reagent.
The Benedict’s Reagent’s main ingredient is copper sulphate solution, but it is spiked with sodium citrate and sodium carbonate. You can find it easily in our biology lab packages .
Ingredients required
- Test tubes
- Dropper
- Test tube holder
- Water bath setup
- Sample solution or water extract (we used OTC glucose powder)
- Benedict’s reagent
How to perform Benedict’s test for glucose
- First, you need to prepare the water extract (or solution or suspension) of the sample in a clean test tube. In our case it was easy since clinical glucose forms clean solutions clearly.
- Pull out a little of Benedict’s solution from its bottle using the dropper. Pour 5-6 drops of it in the test tube. It would, of course, depend upon how much of the sample solution you made. Anyway, keep adding till you get a nice light blue solution.
- Set up a water bath. You would need the whole setup for a water bath, like a bunsen burner, tripod, wireframe, beaker etc. You can also use an actual water bath machine . If you don’t have access to those, you can, technically, use a spirit lamp directly, but that’s not recommended.
- Heat the test tube slowly in your water bath (or lamp, carefully). The color of the solution in the tube should start to darken.
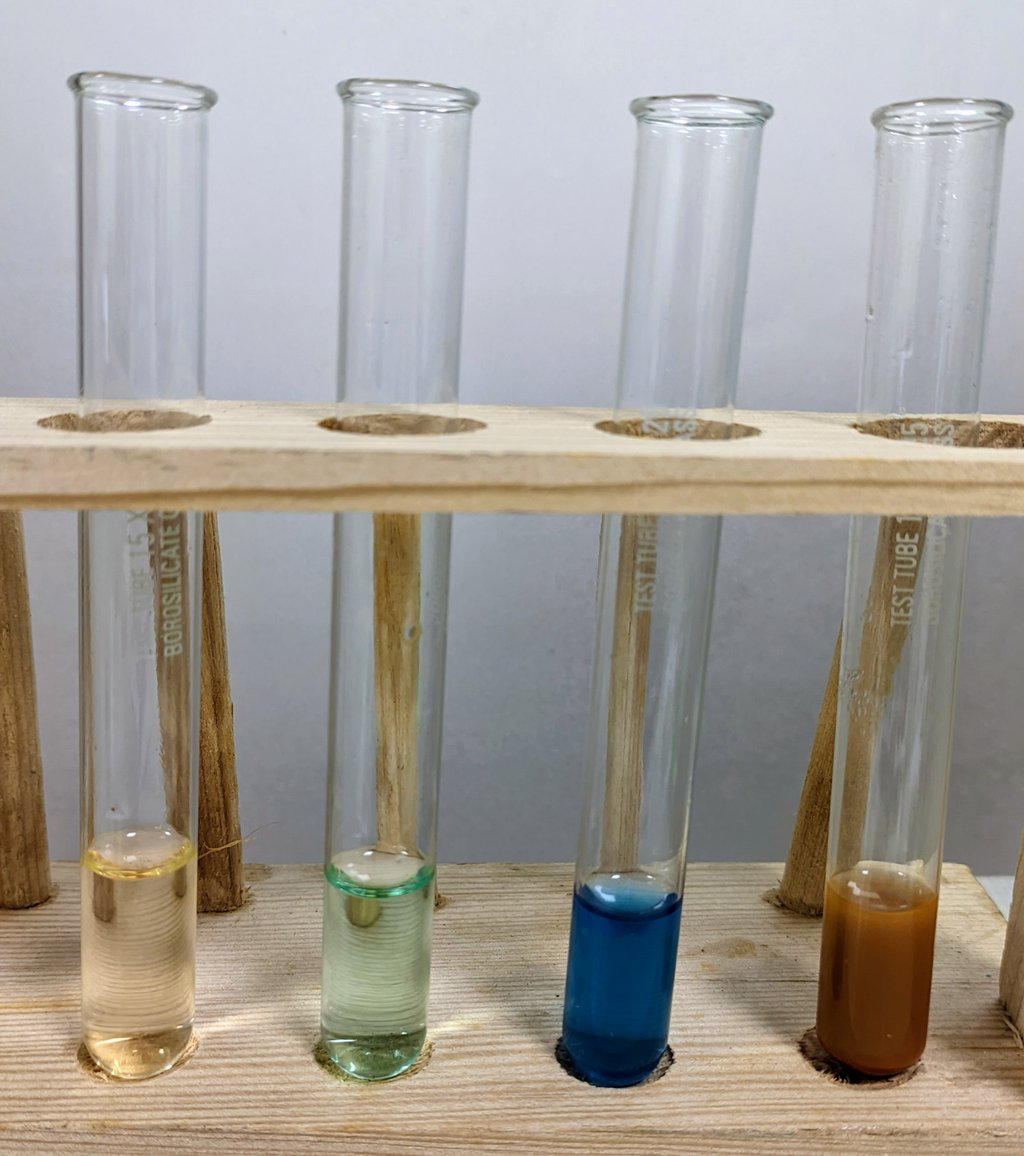
- Observe the color. It should change from blue to green, and then turn reddish and opaque. With time, you should be getting a brick-red precipitate which will slowly fall to the bottom of the tube. This is conclusive proof that there is indeed glucose in the solution.
Explanation of the Benedict’s test
The principal element in Benedict’s reagent is copper, specifically, Cupric ions. With two empty spaces in the outer orbit, highly charged. And in glucose-type compounds there are aldehydic or ketonic groups, which are reducing elements. Meaning, they are ready to reduce highly-charged cations to a lower level.
Obviously, these two opposites attract each other strongly. The glucose gives one oxygen to the copper cations, reducing them from cupric to cuprous. It itself changes into gluconic acid. And the copper? It happily attaches to the free electron and forms cuprous oxide, which is brick-red in color and insoluble in water. That is what you see falling to the bottom of the test tube.
The two sodium salts in the reagent act as intermediary agents for these interactions.
Fehling’s Test for Glucose
Another way to detect reducing sugars is the Fehling’s test, with Fehling’s solution A and B. Solution A is basically a 7% CuSO4 solution. Solution B is potassium sodium tartrate made highly alkaline using KOH.
They are available in the market, but they are also easy to prepare on site which is the precise reason Fehling’s test still exists. Otherwise it would be overshadowed by Benedict’s. Anyway, Fehling’s test is still important in schools and so we will explain it here.
Ingredients required
- Test tubes
- Dropper
- Test tube holder
- Fehling’s reagent A (also may be known as Fehling’s solution 1)
- Fehling’s reagent B (also may be known as Fehling’s solution 2)
- Water bath setup
- Sample solution or water extract (we used OTC glucose powder)
How to perform Fehling’s Test for Glucose
It isn’t much different from Benedict’s test. The difference being in the number of steps where you have to prepare the final solution. We used glucose powder as the sample.
- Prepare the sample solution or water extract of the sample. About 4-5 ml would suffice, of 5% strength would suffice.
- Add 2-3 drops of Fehling’s solution A to the test tube. The liquid in the tube should turn light blue, the color of copper sulphate solution.
- Now add the same amount of Fehling’s solution B to the test tube. After a little shake the tube’s liquid should turn dark blue.
- Quickly start heating the tube in the water bath (or on a spirit lamp, carefully). Don’t let the solution rest or else the results may not turn as expected.
- If the sample has glucose, the solution would turn brick-red ‒ and when kept still it would precipitate to the bottom of the tube.
Explaining Fehling’s test for glucose
Fehling’s test works more or less the same way as Benedict’s, with red cuprous oxide precipitate. The two Fehling’s solutions combine to make an unstable bistartarocuprate complex, which would turn into black cupric oxide precipitate if left alone for a while. That’s why we don’t let it stay; the Fehling test has to be done fast.
When a reducing sugar is present in the solution, it reacts with the bistartarocuprate complex to release the copper ions. They take an oxygen or hydroxyl ion from the aldehyde or ketone groups of the sugar, and turn into cuprous oxide which is brick red in color and not soluble in water.
Which Glucose Test is Better ‒ Benedict’s or Fehling’s?
Fehling’s is the older experiment, from the 1850’s. It worked well till Benedict’s came, but then went out of favor at research labs because of its unstable nature. First of all, the mixed Fehling’s solution is unstable and will break up to produce cupric oxide soon. Secondly, Fehling’s B is also unstable and doesn’t last long in storage.
But above all what lets down Fehling’s test is that it works only in a strongly alkaline environment. So, if you want to find out if there is glucose in an acidic or even neutral solution, you’re fresh out of luck with Fehling. In a non-highly-alkaline environment, the copper ions won’t be easily reduced with Fehling, and there will be false positives, like from alcohol.
There are other issues with Fehling’s test too. For example, it cannot detect aromatic aldehydes. Instead, you will have to use Benedict’s test in case you are serious about glucose tests.
Sucrose Test
Sucrose and similar sugars are non-reducing sugars, such as normal cane sugars that we consume every day. They won’t give a positive result in a standard glucose test like Benedict’s or Fehling’s. The trick is to first convert the non-reducing sugar to reducing sugar, and then do Benedict’s test (Fehling’s would be hard to do here ‒ you’ll understand why in a minute).
Ingredients required
- Test tubes
- Dropper
- Test tube holder
- Water bath setup
- Water extract of sample (we used general cane sugar)
- Concentrated hydrochloric acid
- Sodium hydroxide (or sodium bicarbonate) solution
- Benedict’s Reagent
How to perform the sucrose test
- Prepare the water extract ( original solution ) of the sucrose sample. Take nearly 5 ml of it in a clean dry test tube.
- Add 3-4 drops of concentrated HCl to the test tube using the dropper. Gently stir the tube to mix well. Take care so that it does not touch your skin.
- Set up your water bath and boil the tube for a couple of minutes.
- Let the tube sit for a while to cool a bit.
- Now you have to neutralize this solution, as it is highly acidic now. Add sodium hydroxide solution drip by drip till have neutralized it completely. No worries if you’ve made it a bit alkaline too.
- TIP: use sodium bicarbonate instead of NaOH. You have to work by guessing with the hydroxide, but with the bicarbonate you will be able to see the neutralization process visibly. As long as there is acid in the solution, adding a drop of NaHCO3 to it will produce bubbly gas.
- Now just perform Benedict’s test as described above with this solution. If there was sucrose in the sample, the solution will finally produce brick-red precipitate when cooling off. Otherwise it would remain blue.
Explaining the sucrose test
The basic idea of the sucrose test is to break it down to glucose and fructose which gives positive results in the Benedict’s test. To do this, we hydrolyse the sample with hot HCl. This produces the reducing sugars ‒ but in turn also highly acidifies the solution which is not good at all for good Benedict’s results. So, we neutralise it using simple hydroxide or bicarbonates, and add Benedict’s reagent. Heating this will reduce the cupric ions of the reagent into cuprous oxide, which you get to see as the reddish-brown precipitate.
Biuret Test for Proteins
Proteins are the building blocks for much of our body, especially the muscly parts. That is why you need protein food most if you are bodybuilding and gaining muscle mass. Also, proteins repair any damaged body part and are very important while growing up.
To detect the presence of proteins in foodstuff there are various tests, but the biuret test is the most popular by far. The reason for it lies in the availability of its materials. Also, some of the other tests use very dangerous chemicals, not recommended for school use.
Technically, you would be detecting peptide bonds present in the sample, which is the base of common edible proteins. It is basically an acid formed with carbonyl and amino groups. Our goal is to see if our testing chemicals (producing cupric ions) can form a complex compound with this.
Ingredients required
- Test tubes
- Dropper
- Biuret reagents:
- 1% copper sulphate solution
- 40% sodium hydroxide solution
- Sample solution or water extract (we used egg albumin)
- Water bath setup
How to do the biuret test for proteins
- First, you have to prepare the biuret reagents ‒ that is, 1% CuSO4 and 40% NaOH solutions. It is possible that your laboratory may already have it prepared. If not, then you will have to carefully measure out the proper chemical amounts using a precision balance and make the solutions.
- Take the sample (egg albumin, in our case) in a test tube, about 2-3 ml of it.
- Add 3-4 drops of the hydroxide solution into the test tube.
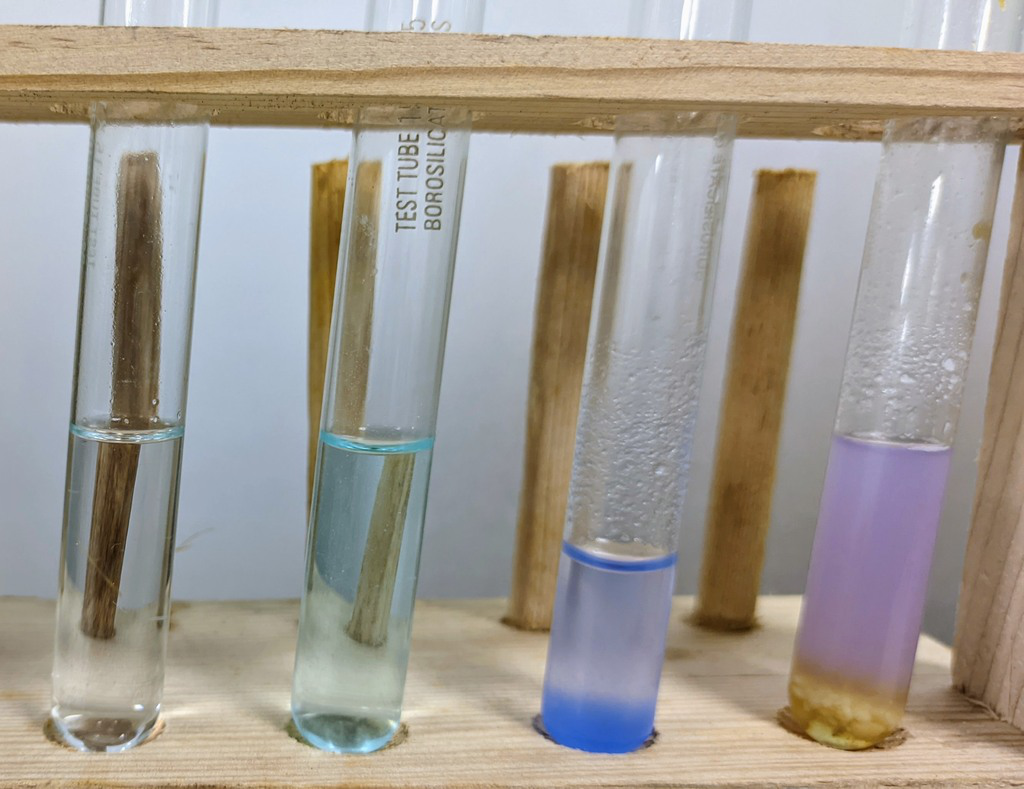
- Add 2-3 drops of the copper sulphate solution into the test tube. The liquid should turn blue.
- Shake the test tube properly to mix the ingredients. Let it stand for a while.
- Now observe the color changes. It may take some time depending upon the concentration of the sample and the quality of the reagent. We got our results within 5-6 minutes.
- If the solution turns pink, proteins are present in the sample.
Paper Droplet Test for Fat
Also called paper spot test, this is by far the simplest method of detecting there is any fat present in a given food item. All you need is a piece of thin (but opaque) piece of paper and a cover glass, with the sample. Since fats are basically oils, when you place the sample on the paper and press, the contact place on the paper should absorb the fat and turn somewhat transparent.
Note: Of course, it is a little bit more work than that in the case of some samples. If your sample is very dry (like a peanut that we took), then just putting it flat on top of the paper won’t display anything. You will have to crush the hard sample and press it against the paper, so it can soak in the oil.
Labkafe Biology Lab Setup
All of the Macro Nutrients Tests mentioned above, including those not described in the article, are possible using Labkafe’s higher secondary level biology lab package . This package has all the chemicals, reagents, glassware, and support apparatus required for the class 11 food tests for CBSE ICSE State boards. If you need this package, or specific items from the package, then you can contact us at 9147163562 any time ‒ our sales rep will help you out. We can ship anywhere in India, and even supply outside India via resellers. Just fill up the contact form below and someone will have a chat with you and hash it out.


Leave a Reply